In a previous post, we added GPIOs to our WAV player to enable a simple user interface. In that example we triggered an interrupt whenever a key was pressed. However, I found it hard to debounce the keypad as we would have to somehow disable new interrupts for a while after a keypress has been detected. A more elegant way is to set up an interrupt handler which is regularly triggered by a timer, say every 20 milliseconds. The interrupt handler scans the keyboard and fills a keyboard buffer accordingly. It is easy to implement a hold-off period since we know that there are 20ms elapsing between each handler call.
In this tutorial we learn:
- How to set up an AXI timer.
- How to connect a third interrupt signal to the ZYNQ fabric.
- How to add a third interrupt handler.
- How to query the presence of an SD card
Interfacing to the AXI Timer
- Use the include file xtmrctr.h.
- Use the object XTmrCtr to interface to the timer.
- The first device ID is XPAR_AXI_TIMER_0_DEVICE_ID (defined in xparameters.h).
- The corresponding interrupt ID is XPAR_FABRIC_AXI_TIMER_0_INTERRUPT_INTR (defined in xparameters.h).
- Here is an example for setting up a timer in a standalone project:
#include "xscugic.h"
#include "xtmrctr.h"
#include "xparameters.h"

XScuGic intCtrl;
XTmrCtr timer;

// This handler is called every 20 ms
void timerInterruptHandler(void *userParam, u8 TmrCtrNumber) {
}

void init() {
	int xStatus = XTmrCtr_Initialize(&timer, XPAR_AXI_TIMER_0_DEVICE_ID);
	if (xStatus != XST_SUCCESS) {
    	fatalError("Could not initialize timer");
	}
	XTmrCtr_SetHandler(&timer, (XTmrCtr_Handler)timerInterruptHandler, (void*) 0x12345678);

	// Initialize the interrupt controller driver so that it is ready to use.
	XScuGic_Config *IntcConfig = XScuGic_LookupConfig(XPAR_SCUGIC_SINGLE_DEVICE_ID);
	if (NULL == IntcConfig) {
		fatalError("XScuGic_LookupConfig() failed");
	}

	int Status = XScuGic_CfgInitialize(&intCtrl, IntcConfig,IntcConfig->CpuBaseAddress);
	if (Status != XST_SUCCESS) {
		fatalError("XScuGic_CfgInitialize() failed");
	}

	XScuGic_SetPriorityTriggerType(&intCtrl, XPAR_FABRIC_AXI_TIMER_0_INTERRUPT_INTR, 0xA0, 0x3);
	Status = XScuGic_Connect(&intCtrl, XPAR_FABRIC_AXI_TIMER_0_INTERRUPT_INTR,(Xil_InterruptHandler)XTmrCtr_InterruptHandler,&timer);
	if (Status != XST_SUCCESS) {
		fatalError("XScuGic_Connect() failed");
	}
	XScuGic_Enable(&intCtrl, XPAR_FABRIC_AXI_TIMER_0_INTERRUPT_INTR);

	// Initialize the exception table.
	Xil_ExceptionInit();

	// Register the interrupt controller handler with the exception table.
	Xil_ExceptionRegisterHandler(XIL_EXCEPTION_ID_INT,(Xil_ExceptionHandler)XScuGic_InterruptHandler,(void *)&intCtrl);

	// Enable exceptions.
	Xil_ExceptionEnable();

	XTmrCtr_SetOptions(&timer, 0,	XTC_INT_MODE_OPTION | XTC_AUTO_RELOAD_OPTION);
	XTmrCtr_SetResetValue(&timer, 0, 0xFFE17B80); // 50 Hz
	XTmrCtr_Start(&timer, 0);
}
Checking if an SD Card is Present
- It can be useful to detect if the user has removed or inserted an SD card. Here is how we can check if an SD-card is inserted:
int isCardPresent() {
	u32 StatusReg = XSdPs_GetPresentStatusReg(XPAR_XSDPS_0_BASEADDR);
	if ( (StatusReg & XSDPS_PSR_CARD_INSRT_MASK) != 0U) {
		return 1;
	}
	else {
		return 0;
	}
}
Open the Main Project
- Start with the project from this post. Or download the complete project further down.
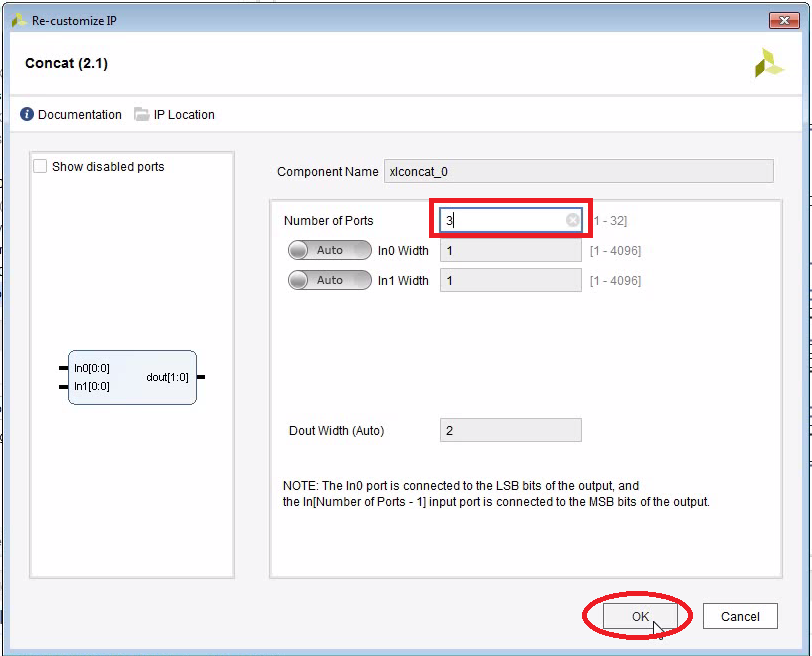
- Change the number of inputs to the concat block to 3:
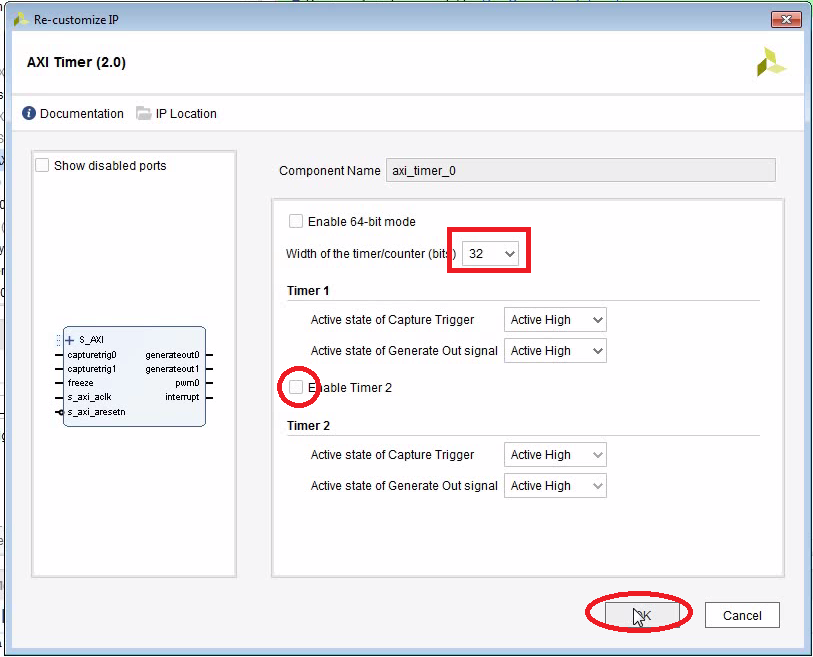
- Add an AXI Timer IP core and configure it:
- Run Connection Automation.
- Connect the interrupt output of the timer to the 3rd input of the concat block.
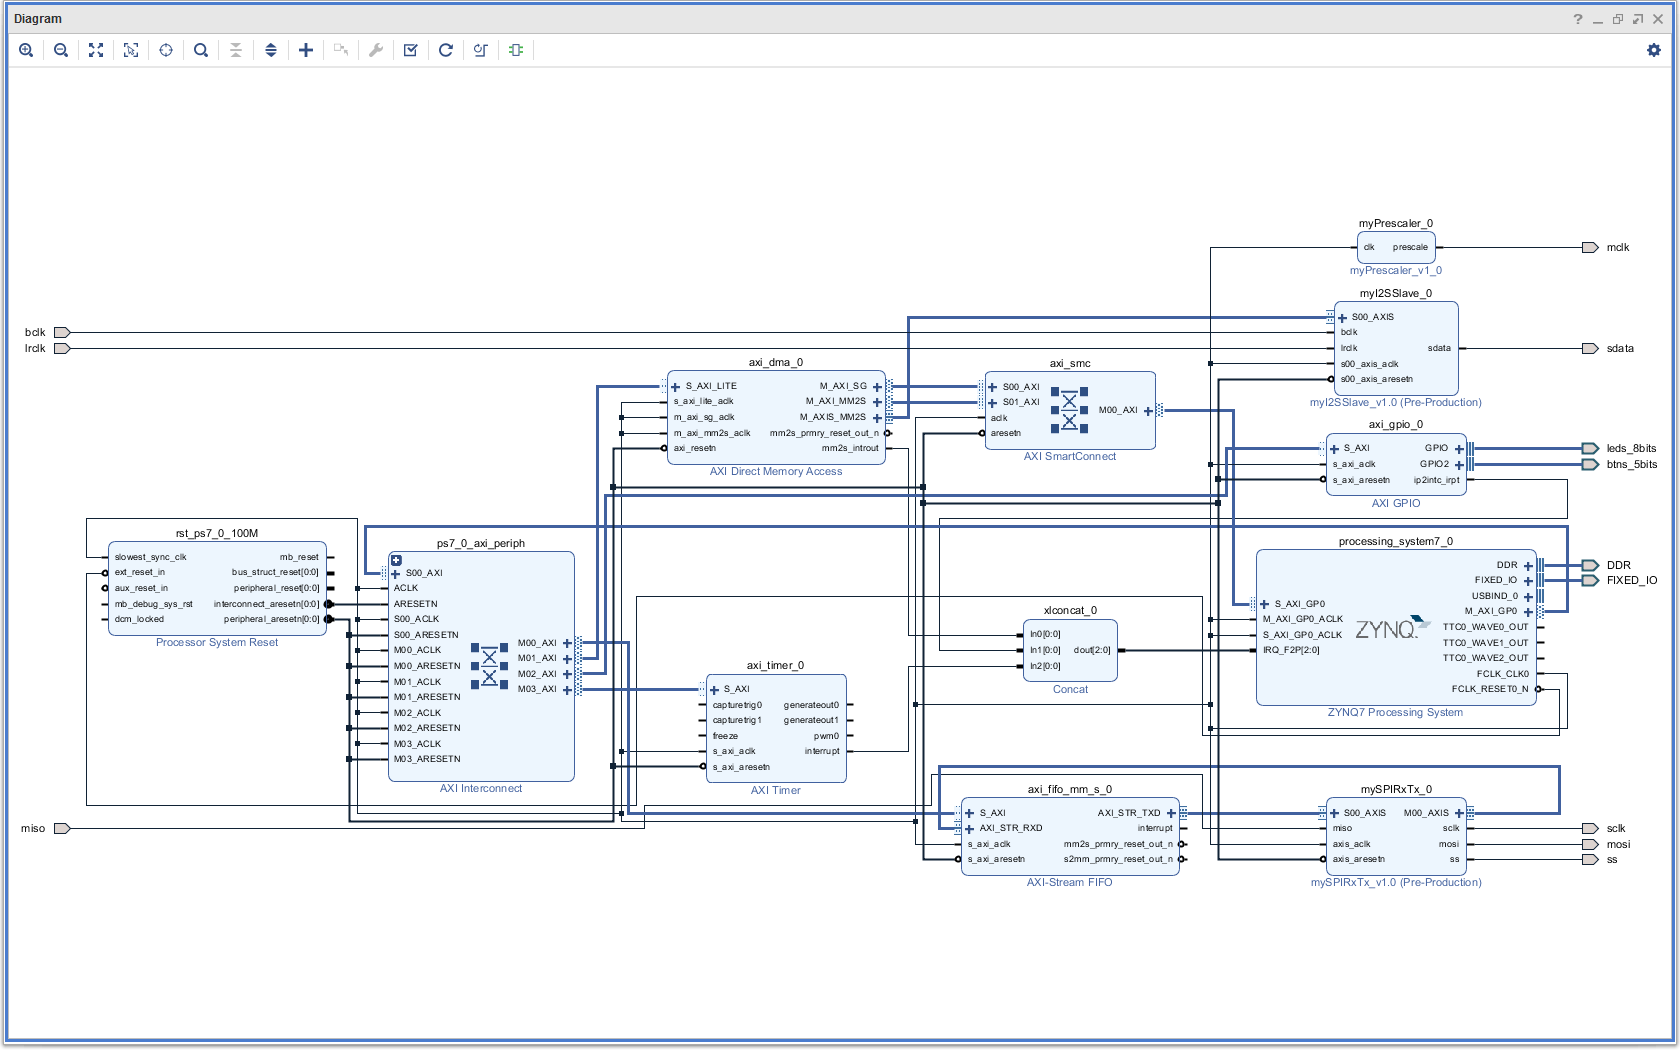
The Complete Block Diagram
Create the Bitstream
- Generate the bitstream.
- Open the Implementation.
- Export Hardware (including bitstream).
Modify the C-Code
- Launch the SDK. I encountered problems occasionally that the SDK creates a new system wrapper project. Normally there is a project named design_1_wrapper_hw_platform_0. I then have two of those. The second one named design_1_wrapper_hw_platform_1.
- Here is the full modified code (helloworld.c):

- Run the program with an SD card inserted:
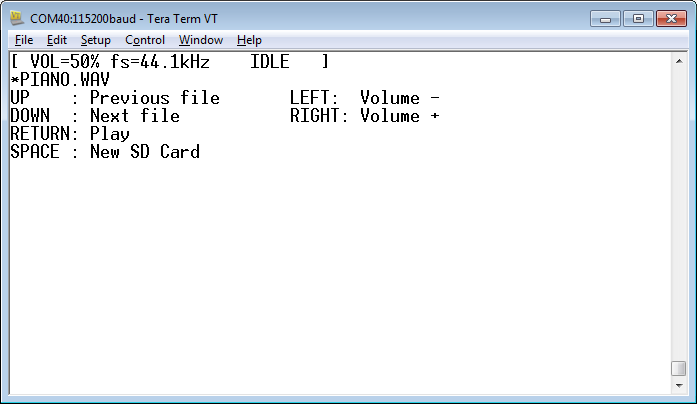
- You can now use the keypad on the Zedboard to navigate up and down. Use left/right to change the volume. Use the middle button to play. Note that the keys are repeated when you hold them down for long enough.
- If the SD card is removed, the program jumps back to mounting an SD card. It will automatically detect when an SD card is inserted.
Download the Complete Project
- Here is a WAV file which I have tested (from the Youtube Audio Library):
- piano.wav
Piano March by Audionautix is licensed under a Creative Commons Attribution license (https://creativecommons.org/licenses/by/4.0/). Artist: http://audionautix.com/ - To upload the software to the Zedboard, open the project in Vivado, then click on “Launch SDK”.
- There seems to be a bug when updating the SDK project which selects a wrong UART driver (refer to “SDK Auto Update Bug” to fix it).
- Select the project CodecDMADemoOneshot and click “Run” (the “play” button at the top of the window).
Next: Using the OLED Display
